Automate Infrastructure Setup for AWS Lightsail
AWS Lightsail is a set of services offered by AWS which can be used to run the infrastructure needed for hosting web applications: virtual servers, managed databases and load balancers. They are similar to the standard offerings from AWS but have a smaller feature set. As a result, the costs are lower and the pricing model is much easier to understand.
However, the Lightsail services can be used to provision the infrastructure for web applications in such a way that common requirements regarding reliability, high availability and - in some regard - scalability can be met. This can be done manually through the Lightsail Console. But it’s a far better practice to use infrastructure as code practices in order to automate the setup and make it repeatable.
Unfortunately, the common tools for infrastructure as code on AWS - CloudFormation and Terraform - do not support Lightsail yet. Nevertheless, infrastructure setup can be automated with a little bit of effort to achieve the same benefits. For this, the AWS CLI or SDKs for the various programming languages can be used. The examples in this post use the AWS CLI. Therefore it is a prerequisite to install and configure it in order to reproduce and customize the steps.
Solution
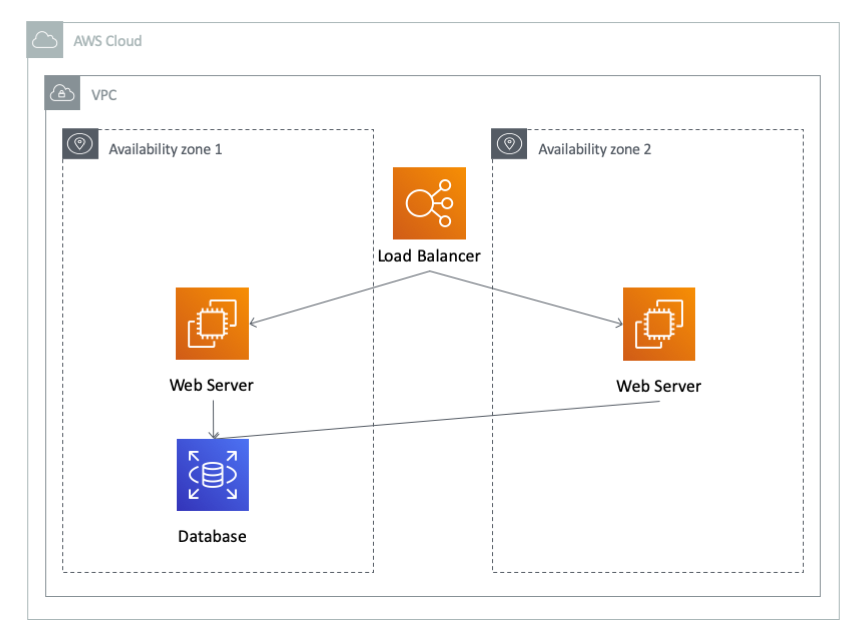
The standard infrastructure setup for a web application consists of a web server and a database. Oftentimes these run on the same server but it’s a better practice to use separate machines. If the infrastructure should be resilient against system failures or should provide zero downtime during system or application updates it’s necessary to run at least two instances of the web server. In turn, this requires to balance the incoming traffic across the web servers which requires a load balancer. The resulting system architecture is shown in the following picture.
For each of the components - load balancer, web server, database - AWS Lightsail provides corresponding services. Using the CLI to setup the solution automatically is shown in the following chapters.
Configuring a Domain
Any website has a domain associated with it. In order to follow all the instructions outlined in this blog post setting one up is mandatory.
aws lightsail create-domain --domain-name "example.com" \
                            --region "us-east-1"
Without setting up a custom domain the ones generated by AWS Lightsail need to be used. Additionally, it’s not possible to create a SSL certificate to configure HTTPS for the load balancer. However, this might be sufficient for the first experiments.
Creating the database
Lightsail supports two database engines: MySQL and PostgreSQL. Various versions are available. Additionally, several instance sizes are available to choose from. The following command shows how to set up a MySQL 5.7 database on the smallest instance size:
aws lightsail create-relational-database --relational-database-name "example-db" \
                                         --relational-database-blueprint-id "mysql_5_7" \
                                         --relational-database-bundle-id "micro_1_0" \
                                         --master-database-name "example" \
                                         --master-username "user" \
                                         --no-publicly-accessible
Note that the database server is configured to not be available to the public internet via the no-publicly-accessible parameter. It can only be accessed from the other Lightsail servers within the same region. This is a reasonable security setting which should be used whenever possible.
Furthermore, no password has been configured for the database. Instead, it is automatically generated by the database service. It can be retrieved from the Console or via the following command:
aws lightsail get-relational-database-master-user-password --relational-database-name "example-db"
For production environments it makes sense to run the database in a high availability configuration. In this case there would be two database instances: a primary and secondary one. The application uses the primary database instance. The database is continuously replicated to the secondary instance. In certain events, e.g. during maintenance or because of a failure, the primary instance is unavailable. In this case the secondary instance becomes the new primary. This automatic failover is transparent for the application and is managed by AWS. As a result, there’s (almost) no downtime for the application. More importantly, there’s no manual intervention necessary.
Switching to this HA setup requires a change in the bundle-id for the database instance. In the example it would be micro_ha_1_0 instead of micro_1_0.
Creating the Load Balancer
The load balancer is associated with a region and can balance any incoming traffic to server instances attached to it. Additionally, it can handle SSL encryption and decryption and automatically manage the associated SSL certificate. This way it is not necessary to do it on the web server instances itself. It makes it easier to manage the certificates and also reduces the load on the servers.
The following command creates a load balancer:
aws lightsail create-load-balancer --load-balancer-name "example-load-balancer" \
                                   --instance-port 80
After creating the load balancer a SSL certificate can be requested:
aws lightsail create-load-balancer-tls-certificate --load-balancer-name "example-load-balancer" \
                                                   --certificate-name "example-certificate" \
                                                   --certificate-domain-name "www.example.com"
Next, the certificate has to be validated. This needs to be done by adding certain DNS records for the domain. The values are provided by the certificate information.
read -r name value <<< $(aws lightsail get-load-balancer-tls-certificates --load-balancer-name "example-load-balancer" \
                                                                          --query "tlsCertificates[0].domainValidationRecords[0].[name,value]" \
                                                                          --output text)
aws lightsail create-domain-entry --domain-name "example.com" \
                                  --domain-entry "name=$name,target=$value,type=CNAME"
After adding these records, it takes a couple of minutes until the certificate is validated.
Once the certificate has been validated successfully, it can be attached to the load balancer. The load balancer can handle HTTPS connection now.
aws lightsail attach-load-balancer-tls-certificate --load-balancer-name "example-load-balancer" \
                                                   --certificate-name "example-certificate"
The last step is to add a DNS record for the load balancer in order to associate it with your domain.
dnsName=$(aws lightsail get-load-balancer --load-balancer-name "example-load-balancer" \
                                          --query "loadBalancer.dnsName" \
                                          --output text)
aws lightsail create-domain-entry --domain-name "example.com" \
                                  --domain-entry "type=A,name=www.example.com,target=$dnsName,isAlias=true"
Now, any requests for the domain are handled by the load balancer. Unfortunately, only errors are returned since no web servers have been associated with the load balancer yet. Let’s change this in the next step.
Creating the servers
The web servers run the actual application. Lightsail provides a bunch of different instances sizes and pre-packaged machine images. In this example we launch an instance running Amazon Linux and install some additional software to run a web server inside a Docker container on it. To launch the instance, the following command can be used:
aws lightsail create-instances --instance-names "example-web-server-a" \
                               --bundle-id "nano_2_0" \
                               --blueprint-id "amazon_linux_2018_03_0_3" \
                               --user-data file://launch.sh
It’s very common to run certain commands once the server is created. The minimum should be to install all pending security updates. But you certainly need to install additional software, e.g. a web server and your web application. This should be scripted in the user data script. An example one looks like this:
#!/bin/bash

# Install security updates
yum -y --security update

# Install Docker
yum -y install docker
service docker start
usermod -a -G docker ec2-user

# Install Docker Compose

# Launch demo container
docker run --name nginx --rm -p 80:80 -d nginx
All traffic to the web server is forwarded from the load balancer it will be attached to. Therefore, it’s a good practice to close any public ports except for the one used for SSH access. This can be done with the following command:
aws lightsail put-instance-public-ports --instance-name "example-web-server-a" \
                                        --port-infos "fromPort=22,toPort=22,protocol=tcp"
Next, the server has to be attached to the load balancer to handle the traffic:
aws lightsail attach-instances-to-load-balancer --load-balancer-name "example-load-balancer" \
                                                --instance-names "example-web-server-a"
Once the web server instance becomes healthy, the load balancer will forward incoming traffic to it.
That’s it!
Comparison with classic AWS services
As mentioned before Lightsail offers some services which are similar to the classic ones offered by AWS. There are two major differences:
- their feature set is smaller
- they have a fixed price
- the infrastructure is not as dynamic
The Lightsail Instance (aka virtual server) essentially is an Elastic Compute Cloud (EC2) instance. However, AWS offers lots of different instance types and sizes suited for different use cases. Additionally, there are different pricing models - on-demand, reserved, spot, etc. - which can have a huge impact on what you pay. Furthermore, EC2 instances are well integrated with other services, especially IAM. For Lightsail Instance there’s only a fixed set of instance types with a fixed monthly pricing.
The Lightsail Load Balancer can be compared to the classic Elastic Load Balancer (ELB) offered by AWS. It can be associated with Instances and can also check their health. The classic ELB is able to add and remove instances automatically based on their load and health. This is done through the Auto Scaling service. This way the infrastructure can scale automatically and is in part able to heal itself. This feature is not available for the Lightsail Load Balancer.
The Lightsail Database corresponds to the Relational Database Service (RDS). Whereas RDS offers lots of different instance types, sizes and database engines the Lightsail Database supports only two database engines - MySQL and PostgreSQL - as well as a limited set of instances. However it also provides important features like a high availability (HA) setup with automatic failover, automatic minor updates and backups.
Therefore, the services provided by Lightsail can be used to build up a professional-grade infrastructure for hosting web applications. If the requirements grow it’s possible to migrate to the professional services.
Costs
The condensed feature set also comes with a reduced price. The classic AWS services have a metered pricing model which scales with the amount of usage. At times this makes it difficult to estimate the actual costs. For example, one of the components of the pricing model for the Application Load Balancer is the number of requests processed. Most of the time it’s only possible to give a very rough estimation.
Another important price component in classic AWS is the amount of traffic. Incoming traffic is always free of charge but outgoing traffic is billed (e.g. $0.09/GB). This can result in huge sums. Again, the amount of traffic oftentimes is pretty hard to predict. With AWS Lightsail the instances come with a default amount of traffic per month. The difference is that all the traffic to and from an instance is metered. Only traffic exceeded things amount is charged.
How does the infrastructure outlined above - load balancer, two web servers, database - compare in monthly pricing?
| AWS Classic | Lightsail | |
|---|---|---|
| Load Balancer | Elastic Load Balancer $22 |
Load Balancer $18 |
| Web Server | 2 EC2 instances t3.medium $70 |
2 servers with 2 vCPU, 4GB RAM, 80 GB SSD $40 |
| Storage | 2 EBS Volumes (80 GB) $20 |
included |
| Database | RDS MySQL db.t3.small $29 |
MySQL 1 vCPU, 2 GB RAM, 80 GB SSD $30 |
| Storage | EBS Volumes (80 GB) $11 |
included |
| Total | $152 | $88 |
So the classic AWS infrastructure is almost twice as expensive as the AWS Lightsail offering. The calculation can be reproduced with the Simple Monthly Calculator.
Additionally, for the classic infrastructure traffic costs are not included. They are charged at $0.098/GB ($0.09 outgoing traffic + $0.008 for data processed by ELB). Therefore, 100GB would be charge at $9.80, a Terabyte would cost $100. Each of the Lightsail instances already come with 4TB free traffic per month which would cost $800 in classic AWS. Therefore, hosting a high traffic site in AWS can get pretty expensive when compared to Lightsail. Oftentimes, the features of Lightsail are sufficient for many use cases.
Summary
With these simple commands it’s possible to completely automate the setup of the infrastructure for hosting web applications consisting of a load balancer, multiple web servers and a database. Additionally, the costs are significantly lower than using classic services provided by AWS. Although, the feature set of the Lightsail services is limited many best practices regarding high availability, redundancy and security can be implemented.
The scripts for launching the infrastructure can be found at GitHub.