A Build Pipeline for Jekyll Sites
Hosting a website based on Jekyll on AWS is pretty easy and also cost-effective. I’ve described how to do it in a previous blog post. The next step is to automate the actual publishing process as much as possible. This way it becomes really easy to push out updates to your site.
If you are already managing the code of your Jekyll site in a Source Code Management (SCM) system like git it’s actually pretty easy to automate the whole publishing process. This way the site is updated whenever an update is pushed to the corresponding source code repository. This post is based on the assumption that GitHub is used for hosting the git repository.
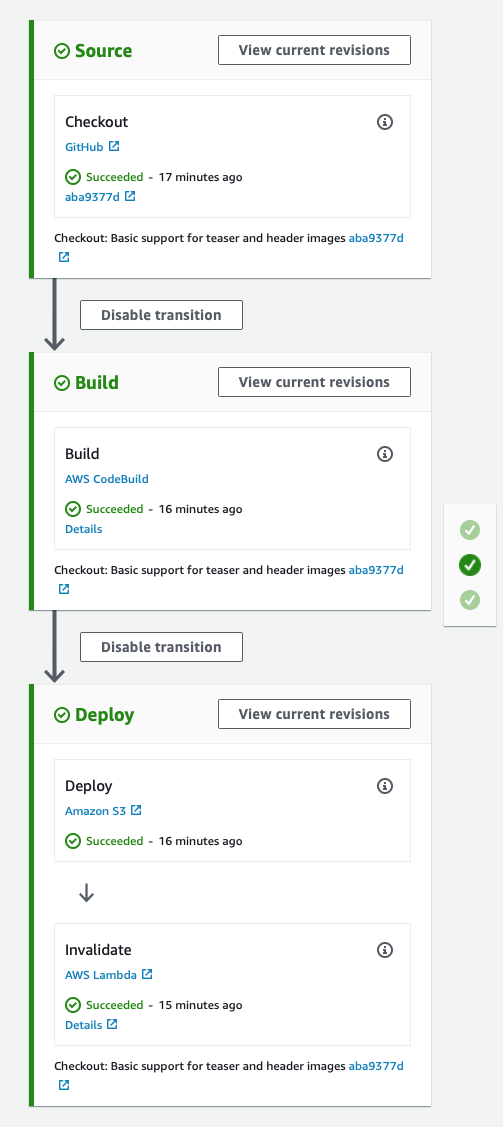
On AWS the services CodePipeline and CodeBuild can be used to set up a so-called CI/CD pipeline. Code Pipeline will be triggered every time a change is pushed to the master branch of the repository of your site. It gets the source code and invokes a CodeBuild project to actually builds the site. Next, it takes the build results and publishes the contents to the S3 bucket used for storing the contents of your site. Finally, you can invalidate the corresponding CloudFront distribution in order to ensure that changed content is immediately delivered to the visitors of your site.
I’ve created a CloudFormation template which you can use to create a pipeline for your site within a couple of minutes. The pipeline has the following parameters:
- repository details (owner, name, branch)
- the name of the S3 bucket to which the contents will be published
- the ID of the CloudFront distribution which will be invalidated
Since the pipeline should be triggered whenever a change is pushed to the repository it is necessary to connect it to GitHub. This is done by providing a Personal Access Token you need to create in GitHub. The CloudFormation template expects it to be stored in the Parameter Store of the AWS Systems Manager. How to create the token is described in the GitHub documentation. The token is then stored in the Parameter Store with the path /github/personal_access_token. You can use the AWS CLI to store the token:
aws ssm put-parameter --name /github/personal_access_token \
                      --value YourToken \
                      --type String \
                      --region us-east-1
Important: The token must be stored in the same region in which you want to set up your pipeline. And your pipeline must be set up in the same region in which the S3 bucket resides.
With all the required information at hand and the personal access token stored to the Parameter Store you create the pipeline by launching a new CloudFormation stack based on the aforementioned template with the click of a button:

The CloudFormation template already contains a basic build specification to instruct CodeBuild how to build a Jekyll site. It looks like this:
version: 0.2

phases:
  install:
    commands:
      - bundle install
  build:
    commands:
      - JEKYLL_ENV=production bundle exec jekyll build

artifacts:
  base-directory: '_site'
  files:
    - '**/*'
As you can see the first step for building the site is to install all the dependencies of your Jekyll project. Next, the familiar jekyll build command is executed to generate the contents of your site. Finally, the generated content in the _site folder is packaged as the output of the build project. This output is then used by CodePipeline to push it to the specified S3 bucket.
That’s it! With this simple setup, your Jekyll site is published within minutes whenever you push updates to the master branch.
The template can easily be modified to integrate with other source code providers like AWS CodeCommit or build other kinds of applications to provide the content, like Angular or React.